Pain & Injury Archives - Rausch Physical Therapy & Wellness

Blog

What to Do for Hand and Wrist Pain?

We tend to forget how important our hands and wrists are until we start feeling pain there. Due to office work, or sports like climbing or baseball, prolonged inflammation in your hands and wrists can be painful and lead to severe conditions. Learn more about ways to reduce hand and wrist discomfort. Having a physical therapist guide you through recovery is also essential to prevent the pain or lack of mobility from returning.

Office work is well known for being detrimental to people’s backs due to prolonged periods of sitting.

But, there’s another body part that excessive typing, texting, scrolling, and mouse-clicking wreak havoc on, too—the hands and wrists.

Hand and wrist pain is a notable side effect of office work that many people assume they have to live with. Thankfully, there are actually numerous ways to lessen office-work-induced hand and wrist pain, and ways to help prevent it.

Let’s look at why hand and wrist pain are so prevalent and what you can do about it.

Common Causes And Effects of Hand And Wrist Pain

There is an abundance of hand movement repetition in the tasks for office work, with the main activities performed being typing, scrolling or clicking with a mouse, and texting on a cell phone.

When we type, we use our fingers in an unnatural way, and we often keep them hovered awkwardly above the keyboard for prolonged periods of time. This puts stress on our wrists, and the typing itself overworks our fingers far more than anything else we generally do in life.

When we overuse our hands and wrists by typing, our bodies are put at risk of developing numerous conditions. These include:

  • Carpal tunnel syndrome
  • Trigger finger
  • Wrist tendonitis
  • Repetitive strain (or stress) injury

These effects are usually not permanent, but they can be very painful. Once you have frequent hand and wrist pain from typing, other activities in your life, such as exercise or sports, or even opening doors, might also be affected.

Additionally, the prolonged inflammation in your hands and wrists can lead to arthritis in the coming years.

Ways to Reduce Hand and Wrist Pain

In addition to life being better when you’re not in pain, it’s important to take steps to prevent that potential occurrence too. Luckily, there are numerous actions you can take to prevent your hand and wrist pain from worsening.

Pain Relieving Stretches

Pausing to stretch your hands and wrists can help bring back flexibility and can improve the blood flow that may be impacted by a lack of arm movement.

At the least, it’s wise to do some hand and wrist stretches at the start, middle, and end of your workday.

If you notice that stretching your hands and wrists reduces your pain, you may opt to stretch briefly every hour or two. In the same way, as it’s a good idea to get up and stand every hour to break up your sitting, it’s a good idea to keep your hands and wrists flexible as you use them throughout the day.

Wrist Stretching

Stretching your wrists is an easy way to reduce the pain in them caused by typing. Some examples of wrist stretch you can try are below:

  • Raise and lower your hands in a “stop” position with your arms outstretched in front of you.
  • Make and hold a fist.
  • Rotate your hand up and down while making a fist.

Hand and Finger Stretching

Stretching our hands and fingers isn’t something we tend to think a lot about unless we’re doing a sport that involves gripping, but it can be very helpful in reducing the pain from typing and texting all day.

Here are some ways to stretch your hands and fingers:

  • Straighten your fingers and palms flat against a surface and hold this position for thirty seconds.
  • Bend your fingertips down to make a bear claw shape and hold for 30 seconds.
  • Straighten your fingers and palm on a surface and slowly lift and lower each finger and thumb individually.

It can also be helpful to use a grip strengthener. To use one for hand stretching, you’ll hold it in your hands, squeeze, hold briefly, and release. This act of squeezing and relaxing helps to loosen the muscles. Grips strengtheners can also be used to reduce tension.

Strengthening Exercises

You don’t need a whole workout for your hands and wrists, but taking the time to strengthen this part of your body can have the effect of less pain due to overuse. You don’t need any gym equipment for these exercises.

Use Household Items

There are numerous household items that can be used to help strengthen your hands and wrists such as:

  • Rubber bands
  • Towels
  • A hammer

Exercises using those items can be done in just a few short minutes and are very simple, such as putting a rubber band around your fingers and then pushing your fingers out against it.

Wrist Curls

Unlike the small and simple moves with household items, wrist curls are a more common move for actual exercise workouts.

They can be beneficial to your hands and wrists as well as your forearms, which is the part they’re best known for strengthening.

The goal for this exercise isn’t to get sore, as it might be for some people when they use weights, but to slowly and gradually build strength so that your hands and wrists are in the best possible condition for the daily activities they perform.

Home Remedies For Pain

There are many inexpensive and easy ways to manage pain by reducing inflammation. You could take an over-the-counter pain reducer, which serves to temporarily lower inflammation or try one of the following remedies below.

Heat and Cold

Alternating between hot and cold treatments through the use of a heating pad and an ice pack can lower inflammation while also providing temporary relief from pain. In the same way that you’d use heat and cold to relieve a sports injury, you can do the same for hand and wrist pain caused by overuse.

Turmeric

This Ayurvedic root is well proven to relieve pain and inflammation. It has been used for millennia and is an incredibly effective natural pain reliever.

With a bright golden color and a mild flavor, you can use ground turmeric in your meals, drink shots of the fresh juice, or make it into tea.

Ginger

Also, an Ayurvedic root used for many generations as a pain and inflammation reducer, ginger has been proven effective for relieving symptoms of arthritis.

Similarly to turmeric, you can use ginger as a dried spice in your cooking, make a tea from the root or powder, or drink fresh juice shots.

Reduce Systemic Inflammation With Everyday Activities

When you make efforts to reduce inflammation, it won’t only be your hands and wrists that will thank you.

Reducing systemic inflammation improves health overall and helps lower your risk for an assortment of illnesses.

There are many ways to go about reducing inflammation on a daily basis. Some you can try include yoga, eating fewer inflammatory foods, managing stress, and getting a sufficient amount of sleep.

How to Prevent Hand and Wrist Pain

Now that you know of ways to reduce the wrist and hand pain you may already have, it’s helpful to know how to keep it gone once you get rid of it.

In addition to taking steps to lower inflammation in your body, and stretching and strengthening your wrists, proper positioning when typing and the use of wrist and hand supports can lower the chances of your pain returning.

Positioning

When sitting to type, start by making sure you’re using a supportive chair that allows for good posture. Having your back straight will assist with the positioning of your arms and wrists. You’ll want to keep your hands hovered lightly over the keyboard, not resting on it, and your fingers curved over the keys.

If you aren’t able to find a comfortable position, you can try a keyboard with a different shape than the one you currently use.

Cushioning

In addition to choosing a keyboard that feels comfortable for your hands, you may find extra comfort in a mouse cushion and a keyboard cushion.

Though a mouse cushion can be used while you are actively using your mouse, a keyboard cushion should only be used when you are paused on typing. That’s because if you use it while you’re typing, you’ll be pushing your wrists up at a sharp angle.

Utilize a keyboard cushion while scrolling with your mouse, taking a brief break in typing, or reading.

Wrist Support Products

There are several types of products that provide support to your hands and wrists. In order to find one that allows you enough mobility while simultaneously providing sufficient support, you may need to try a few on.

Support options for hands and wrists include stabilizers, wraps, and braces.

Your wrists and hands may be in pain, but they don’t have to be! Try one or more of these suggestions to keep yourself pain-free, no matter how much you type.

Reference: {https://www.verywellfit.com/what-to-do-for-hand-and-wrist-pain-5118083}


At Rausch PT, our physical therapists can formulate a recovery plan to help get you back on track – and there’s no prescription needed to see a PT. Visit our Facebook page at www.facebook.com/rauschpt or call us at 949.336.1089 to book an appointment.

What to Do for Hand and Wrist Pain? 1

If you find yourself in discomfort or think you could benefit from a personalized exercise plan, talk to a Physical Therapist.

Let’s talk! We are here to help. Give us a call for a complimentary assessment. Did you know there’s no prescription needed from a doctor to see us? (949) 276-5401

Physical Therapy and Pain Management

Sometimes pain relief can be accomplished through physical therapy. Physical therapy (PT) involves treatments that focus on the prevention and management of injuries or disabilities. PT helps to relieve pain, promote healing, and restore function and movement.

PT is practiced by a professionally trained physical therapist. A physical therapist is a specialist skilled and educated specifically in the evaluation and conservative management, including rehabilitation, of orthopedic, neurologic, and cardiovascular conditions…

How Is Physical Therapy Used to Treat Pain?

A therapist may focus on decreasing pain with either passive or active therapy. Examples of passive physical therapy include:

  • Manual therapies
  • Heat/ice packs
  • Electrical stimulation, including TENS units
  • Ultrasound
  • Dry needling
  • Cupping

Examples of active physical therapy include:

  • Movement-based activities, including stretching and range of motion exercises
  • Specific strengthening exercises
  • Pain relief exercises
  • Low-impact aerobic conditioning

Points to Consider About Physical Therapy and Pain

An important aspect to keep in mind about physical therapy and pain relief is that each individual may respond differently to therapy. People have different types of bodies, different patterns of movement, and different habits. Physical therapists and their trained staff can monitor each individual and attempt to correct improper habits and movement patterns.


Reference: {https://www.medicalnewstoday.com/articles/327169.php}


If you find yourself in discomfort or think you could benefit from a personalized exercise plan, talk to a Physical Therapist.

Let’s talk! We are here to help. Give us a call for a complimentary assessment.
Did you know there’s no prescription needed from a doctor to see us?
(949) 443-0713

logo-top

Do you know what shoulder and neck pain often have in common…?

The thoracic spine is often overlooked as a link in the origin of shoulder pain and/or neck pain. It shouldn’t be that hard to imagine once you think about the anatomy. The thoracic spine consists of 12 vertebrae stacked on top of each other from the base of the neck to the mid-back. A notable feature of the thoracic spine is that each vertebra is connected to a rib. The “ribcage” is comprised of 12 ribs that attach in the back (posterior) to a vertebra (T1 – T12).

The thoracic spine sits just below the seven cervical vertebrae which make up the neck. However, the cervical vertebrae in conjunction with the top 4 thoracic vertebrae contribute to complete cervical rotation. When you look over your shoulder to check your blind spot, it requires movement starting from the first cervical vertebrae to the fourth thoracic vertebra. This is where the inherent problem lies…


If someone has a stiff (hypermobile) thoracic spine, it leads to increased movement of the cervical spine (the neck) to make up the lack of thoracic spine motion. Excessive motion is one of the causes of wear & tear in the body and correlates with development of osteoarthritis.

The shoulder is linked together by the scapula (shoulder blade). The shoulder blade attaches to the humerus and the clavicle, which make up the shoulder girdle. The scapula lies on the back of the ribcage. Therefore the position of the thoracic spine determines the resting position of the scapula. A common problem affecting patients with shoulder pain is thoracic hyper-kyphosis: an abnormally increased amount of thoracic forward movement. This leads to stiffness of the spine, decreasing the spine’s ability to move in the backward (posterior) directions. If the spine has difficulty moving posteriorly, then so does the scapula. This is the inherent problem associated with the development of shoulder impingement and shoulder dysfunctions.


RauschPT-logo

Let’s talk! We are here to help. Give us a call for a complimentary consultation. We would love to meet you.

Did you know there’s no prescription needed from a doctor to see us – but we will communicate your progress and treatment to your doctor if you’d like us too!
(949) 276-5401

Disclaimer — All the information that you find on our blogs and social media pages is for informational purposes only and is not intended to be used as your personal professional diagnosis, or treatment. Come and see us for your excellent, personalized care! https://rauschpt.net/

Tips for healing a sprained ankle fast

A sprained ankle is an injury to one or more ligaments in the ankle. Mild sprains may involve overstretching and irritating the ligaments, while severe sprains can cause the ligaments to tear completely.

Ankle sprains are common injuries, particularly among people who play sports.

They can be very painful, and severe sprains can require months of recovery. However, a person can do several things at home to help speed their healing and reduce the risk of reinjury.

Below, find out what to do after spraining an ankle. We describe first aid and longer-term methods of supporting recovery.

First aid

Anyone who thinks that they have sprained an ankle should receive first aid. Avoid putting any weight on the ankle, as this increases the risk of broken bones and other injuries. Sit in a comfortable position, with the ankle elevated to reduce swelling.

Nonsteroidal anti-inflammatory drugs, or NSAIDs, such as ibuprofen, can also help alleviate swelling and pain.

If possible, wear a temporary brace or bandage to support the joint and prevent it from moving.

If crutches are available, some people find that they can help with balance and mobility while allowing the ankle to rest.


It is difficult to diagnose an ankle sprain based on symptoms alone. For this reason, a person should see a doctor.

Most family physicians and doctors at urgent care clinics can quickly diagnose a sprained ankle. If the injury is very serious, they may refer the person to an orthopedist or foot and ankle surgeon.

Stay in the know. Get our free daily newsletter

Expect in-depth, science-backed toplines of our best stories every day. Tap in and keep your curiosity satisfied.

Tips to aid healing

The following methods of home care may support faster recovery while helping to protect against further injuries.

RICE

The acronym RICE stands for: rest, ice, compression, and elevation. Doctors often recommend these tactics to reduce swelling and inflammation in the days after an injury.


Rest

Resting the ankle is key for healing, and wearing a brace can help stabilize the injured area. Attempting to return to sports or other activities too quickly increases the risk of another injury.

Ice

Using an ice pack may reduce blood flow to the injury and help ease pain and swelling.

The American Academy of Family Physicians suggests applying an ice pack to the sprain for 10–20 minutes at a time. Wrap the pack in a towel before laying it against the skin.

However, the National Athletic Trainers’ Association reviewed the evidence for the use of ice on injuries in 2013. They found that, while doctors commonly recommend applying ice, there is limited evidence to support its effectiveness.

If ice does not help relieve symptoms, use other treatments instead.

Compression

Compression helps stabilize the injured joint and may reduce swelling.

Try wrapping a bandage around the injured ankle. The bandage should be snug, but not so tight that it digs into the skin, hurts, or causes numbness.

Elevation

Elevating a sprained ankle reduces the accumulation of fluid in the joint. This can ease swelling, which may also help reduce pain.

Try sleeping with the foot and ankle propped up on pillows at a level higher than the heart. When sitting or resting, use pillows or a footrest to keep the foot and ankle elevated.

Heat

Heat increases blood flow to an injury, which can speed healing. Some people also find that it helps relax tight muscles, easing pain and tension.

However, do not use heat while the ankle is still swollen, as this can increase inflammation and slow healing.

Once the swelling goes down, try applying a heat pack for 15–20 minutes at a time.

Some people find relief from alternating heat and ice packs. Only try this after the swelling is gone — not immediately after the injury.

Stretching

An injury to the ankle puts nearby muscles and other structures at risk of damage. This is especially likely if the tissues have become weak from disuse.

Stretching keeps the muscles strong and limber. It also helps more blood circulate to the area, which may help the ankle heal faster.

Gently stretch the ankle by moving it in all directions at least three times each day. Try flexing the foot forward, then backward, or rolling it clockwise, then counterclockwise.

However, it is important to avoid overextending the ankle or moving it in any direction that hurts.

Walking

The pain and swelling that immediately follow an ankle sprain may be severe. This can make it impossible for a person to put any weight on the joint.

As the swelling goes down, walking can promote healing. Start by walking short distances within the house. Then, gradually build up to longer distances as the ankle begins to heal.

However, walking may require a person to hold the injured ankle in an unusual position or twist the body to avoid putting excess weight on the joint. If this is the case, wait 1–2 days, then try again.

Exercise

Exercise can restore strength and balance while preventing the muscles in the area from weakening. This can reduce the risk of another sprain.

After the swelling goes down and walking is comfortable, it may be a good idea to start exercising the ankle.


A person can try performing the following exercises for 10–15 minutes every other day:

On a low step, stand with the heels hanging backward over the edge. Drop the heels slightly, and hold the position for a few seconds. Then, elevate the heels above the toes.
Balance on one foot for 30–60 seconds, then switch sides, to promote equal strength in both joints.
Loop an elastic exercise band under the foot for gentle resistance. Move the ankle clockwise, then counterclockwise.
Play catch while balancing on one leg, then the other.

Massage

Massage can help ease pain while promoting blood flow to the sprained area.

If the injury is particularly severe or painful, a person should seek advice from a qualified massage therapist.

For less severe injuries, a person can try a gentle massage at home. Some people find that massaging the bottom of the foot or heel provides relief. Others prefer to massage around or just above the ankle.

A person should stop massaging the area if it causes pain or worsens symptoms.

Physical Therapy

Physical therapy may especially benefit anyone who experiences long-term pain following a serious sprain and anyone with a history of similar injuries.

A physical therapist will perform an exam of the person’s ankle to identify weak muscles and other issues that can cause pain and increase the risk of injury.


They will also ask about the person’s lifestyle, including any sports.

The physical therapist will use this information to create a customized exercise plan that promotes healing and eases pain.

When to see a doctor

According to a popular myth, a doctor can do nothing to treat a sprain. It is true that sprains do not usually require casts and often heal on their own.

However, the American College of Foot and Ankle Surgeons recommends that anyone who suspects that they have a sprain see a doctor. They may be mistaken and have a different injury that requires treatment, or they may have additional injuries, such as broken bones, which is common.

Also, a doctor can assess the severity of the sprain. Particularly serious sprains can require surgery, physical therapy, and other long-term treatments. Delaying medical attention can delay rehabilitation.

If the pain is mild and a person prefers home treatment, they can wait a day or two. If the swelling does not go down or the pain gets worse, they should see a doctor.

Summary

Sprains are common and usually heal on their own. However, severe sprains that completely sever the ligament may require months of healing and possibly surgery.

Do not ignore the pain of an ankle sprain or assume that there is nothing a doctor can do. Prompt treatment can speed recovery and reduce the risk of chronic or secondary injury.

Reference: {https://www.medicalnewstoday.com/articles/327169.php}


If you find yourself in discomfort or think you could benefit from a personalized exercise plan, talk to a
Physical Therapist.

Let’s talk! We are here to help. Give us a call for a complimentary assessment.
Did you know there’s no prescription needed from a doctor to see us?
(949) 443-0713

logo-top

How Much Does Your Posture Weigh?

Hi, my name is Kathryn and I am a PTA at Rausch PT in Dana Point, CA. Many of my patients would attest that I am a drill sergeant when it comes to posture. Although part of my obsession comes from years of ballet training and teaching, my main reason for meticulous awareness of posture comes from the daily encounters I have with patients experiencing posture-related pain. There are many aspects to posture, too much to cover in one blog. So today I would like to focus on one of the most common postural deviations I come across in my clinic and while observing the public: forward head posture or “tech neck.”

Our technology-heavy lifestyle has to lead to an increase in forwarding head prevalence, with up to 75% of people reporting some sort of neck-related pain. There are many possible causes of neck-related symptoms, but poor posture is one of the leading factors. Poor neck posture can have many ramifications including; neck pain, headaches, muscle spasms, shoulder pain, disk herniations, as well as nerve pain through arms and back.

For every 10 degrees that you tilt your head forward, you increase roughly 10 lbs of pull onto your spine and musculature. To put it in perspective, your neck is designed to hold an average of 12 lbs in a neutral position, so an increase in forwarding head to 60 degrees increases the demand by 400%. Our bodies can handle this type of demand for a short period of time with daily movement, but it is when this position becomes the norm that problems arise.

Luckily, any habit can be unlearned with the proper tools. If caught in time, forward head posture can be reversed to relieve pain and prevent any lasting damage.

A few tips to reduce your risk of forwarding head:

  • If you spend any amount of time at a computer you are at risk! Ask your employer for an ergonomic evaluation to assess your workplace set up. If a proper evaluation cannot be provided, adjust your setup to have the monitor at eye level, seat so your hips and knees are at 90’, elbows by your side and 90’ to reach the keyboard.
  • Hold cell phone, tablet, and books at head level vs bringing head down. You can do this by placing a pillow on your lap and propping your elbows on top of it.
  • See a physical therapist! They will be able to assess your posture and tailor a treatment plan for your specific needs. Remember though, any at-home exercises they prescribed need to be completed! You only see your PT twice a week for an hour, so following up with those exercises help with your healing process.

Kathryn Toteroh Physical Therapist (1)-minKathryn Totheroh

Let’s talk! We are here to help. Give us a call for a complimentary consultation. We would love to meet you.

Did you know there’s no prescription needed from a doctor to see us – but we will communicate your progress and treatment to your doctor if you’d like us too! 

(949) 276-5401
RauschPT


Disclaimer — All the information that you find on our blogs and social media pages is for informational purposes only and is not intended to be used as your personal professional diagnosis, or treatment. Come and see us for your excellent, personalized care! https://rauschpt.net/

Tips to Improve Posture

Posture is the positioning of the body when a person is sitting, standing, lying down, or performing different tasks. Researchers have linked bad posture with some uncomfortable health conditions and a high risk of injury, especially during exercise.

Having good posture is very important. Poor body positioning and alignment can cause various health problems, such as:

  • Back and Neck Pain
  • Poor Balance
  • Difficulty Breathing
  • Headaches
  • Incontinence
  • Constipation
  • Heartburn

Poor posture may be responsible for other conditions, as well. According to Harvard Health, researchers are investigating possible connections between bad posture and sleep disturbances, fatigue, and mood disorders.

Poor posture can be habitual, and it may also stem from poor muscle tone and low levels of strength and flexibility.

There are many ways to overcome habitual bad posture and build the right muscles.

Exercises and stretches

The most helpful exercises for improving posture affect the core — the back, buttocks, and abdomen.

Bridge


Begin by lying flat on the back with the legs shoulder-width apart, the knees bent, and the heels as close to the buttocks as possible.

With the hands at the sides, lift the buttocks and lower back off of the floor. There should be a diagonal line from the knees to the hips and down to the shoulders.

Hold this position for a few seconds, then gently lower the hips to the floor. Repeat this exercise 8 to 10 times per session.

Back extension


Lie on the stomach with the legs straight and the arms bent. Look down at the floor, keeping the neck straight and the hands-on either side of the face.

Keeping the forearms flat on the floor and keeping the head and neck straight, gently use the arms to lift the upper body, while arching the back.

Hold this position for a few seconds, then gently lower the body to the starting position. Repeat this exercise 8 to 10 times per session.

Plank


Several variations of the plank exercise can help improve posture. Below is the basic plank, but a person may find different versions more or less effective.

Begin by lying on the stomach. Shift the position so that the weight of the body rests on the forearms and toes, with the rest of the body hovering above the floor. Some people prefer to have their arms outstretched and their hands, not their forearms, touching the floor.

Stay in this position for a few breaths, focusing on keeping the core and abdominal muscles tight, before lowering the body and releasing the position.

Hip flexor stretch

Stand with the legs together. Using the right foot, take a big step forward, keeping both the feet and knees pointing forward.

Gently bend the right knee and lunge forward, until there is a stretching feeling in front of the left hip.

Hold this position for a few seconds, then return to standing. Repeat the exercise, this time using the other foot to step forward.

Standing quad stretch


From a standing position, slowly bend the right knee and bring the right foot up behind the body.

Using the right hand, grab the right foot and pull it closer to the buttocks, until there is a stretching feeling in the hip and quadriceps — a group of muscles in the front of the thigh. Make sure that the knees stay close together.

Hold the stretch for a few seconds and release it, slowly lowering the foot to the floor. Repeat the exercise on the other side.

Chest stretch


Stand straight, with the legs shoulder-width apart.

Using both hands, reach behind the body and interlace the fingers with the palms pointing upward.

Keeping the back and arms straight, gently pull back and down through the shoulders. Hold the position for a few seconds, then release it.

Other tips for improving posture

In addition to regular stretching, there are many ways to improve posture. These include:

  • Using a posture device: There are braces or shirts that gently pull back the shoulders to improve the way that the person sits and stands.
  • Staying active: Exercise can help build up the muscles necessary for maintaining good posture.
  • Being mindful of devices: Make sure that computer screens and keyboards are at a height that encourages healthful posture. Desk chairs and work surfaces should also be at an appropriate height.
  • Maintaining a healthy weight: Carrying extra weight can put extra stress on the muscles and pull the body out of alignment.
  • Getting enough support: Make sure that the buttocks, back, and thighs have enough support when sitting down. Use a small pillow behind the back if necessary, and ensure that the hips and thighs are parallel to the floor.
  • Using the imagination: When standing up, pretend that there is a string extending from the top of the head into the air. Imagine that someone is pulling on that string, keeping head up and the shoulders, hips, knees, and ankles in a straight alignment.

Summary

Good posture is important. Maintaining proper alignment of the body while sitting and standing helps prevent injury and pain and supports the functioning of the muscles and the rest of the body.

Being mindful of body positioning, stretching regularly, and employing some of the tips listed above can help improve posture.

Let’s talk! We are here to help. Give us a call for a complimentary assessment.
Did you know there’s no prescription needed from a doctor to see us?
(949) 443-0713

logo-top

{Reference: https://www.medicalnewstoday.com/articles/325365.php#summary}

Exercises for Easing and Preventing Upper Back Pain

Upper back pain and tension are common complaints, particularly when people feel stressed or spend a lot of time hunched over desks or computers. Exercises that stretch the neck, shoulders, and upper back can help relieve pain and loosen tight muscles.

Muscles tension in the shoulders can also lead to neck stiffness and headaches, so it is important not to ignore upper back pain. Regular stretching can relieve current back pain and help prevent it from returning.

In this article, we describe several exercises and stretches for easing upper back pain. For some of these exercises, it may be a good idea to use a yoga or exercise mat, rather than performing them on hard flooring.

We also cover when to see a doctor for upper back pain.

Cat-Cow Pose

To perform the Cat-Cow Pose:

  1. Begin on all fours. The hands should be underneath the shoulders and the knees directly beneath the hips. This is the Table Pose.
  2. Slowly arch the back upward, pushing down through the shoulders and dropping the head to the chest. This is the Cat Pose.
  3. Hold it for a few seconds, then release it.
  4. Return to the starting position but continue to drop the lower back toward the floor. Gently move the head back so that the chin and nose are pointing upward. This is the Cow Pose.
  5. Hold it for a few seconds, then release it.
  6. Return to the Table Pose and repeat the whole sequence several times.

Wall Stretch

To perform the wall stretch:

  1. Stand with the right side of the body facing a wall.
  2. Bend the right arm at the elbow and place the forearm against the wall. The upper arm should be completely straight so that the elbow forms a 90-degree angle.
  3. Gently take a step forward with the right foot and twist to the left, allowing the right shoulder and upper back to stretch.
  4. Hold the stretch for a few seconds, then return to the starting position.
  5. Repeat the stretch several times on both sides.

Child’s Pose

To perform the Child’s Pose:

  1. Begin in the Table Pose but bring the big toes together.
  2. Slower lower the hips toward the floor, placing the buttocks on top of the feet. While doing this, bring the chest down to rest on the thighs and the forehead down to touch the floor.
  3. Stretch the arms out in front, with the palms touching the floor.
  4. Remain in this position for several breaths or as long as feels comfortable.
  5. Pushing through the arms, slowly return to a sitting position.


Instead of extending the arms forward, a person can also try placing the arms backward beside their thighs. The palms should be facing upward.

Another variation is to stretch the right arm forward while threading the left arm under the right arm and out to the side, rotating the head to face it.

A person then repeats the stretch on the other side. This variation creates a gentle rotation and twist motion in the back and shoulders.

Trunk rotation

To perform the trunk rotation:

  1. Lie on the back with the knees bent and the feet flat.
  2. Gently rotate the knees to the right, keeping them bent.
  3. Hold this position for a few seconds.
  4. Return the knees to the center.
  5. Repeat the stretch several times on both sides.

Neck flexion

To perform the neck flexion:

  1. Sit or stand up straight.
  2. Gently drop the chin to the chest, making sure to stop if there is any pain or discomfort.
  3. Roll the head so that the right ear is down toward the right shoulder. Hold this position for a few seconds.
  4. Keeping the chin down, slowly rotate the head back, continuing until the left ear is near the left shoulder. Hold this position for a few seconds.
  5. Continue this gentle rotation of the head from shoulder to shoulder several times. Pause and deepen the stretch whenever there is muscle tension.

Shoulder roll

To perform the shoulder roll:

  1. Stand or sit up straight, keeping the arms down by the sides.
  2. Gently roll the shoulders forward, lifting them up and down in a continuous circular motion. Try to keep the arms relaxed.
  3. Do this for around 30 seconds, then repeat it in the opposite direction.

Overhead arm reach

To perform the overhead arm reach:

  1. Begin in a sitting or standing position.
  2. Stretch the arms above the head.
  3. Lean to the right, keeping both arms stretched upward. To deepen the stretch, use the right hand to gently pull the left arm to the right.
  4. Return to the starting position.
  5. Repeat the stretch several times on both sides.

Knee-to-chest

To perform the knee-to-chest stretch:

  1. Begin by lying on the back.
  2. Gently lift the legs and bend the knees, bringing them to the chest.
  3. Hug the knees to the chest for a breath, then relax, allowing the feet to return to the floor.
  4. Repeat a few times, as needed.

Thoracic extension

To perform the thoracic extension:

  1. Sit on the floor.
  2. Place the block or roller on the floor behind the body. Slowly lie back so that it supports the upper back area — the thoracic spine. The buttocks should be on the floor and the hands behind the head, supporting the head and neck.
  3. For a deeper stretch, extend the arms above the head while bending the body backward.
  4. Take a few deep breaths and let the back and shoulder muscles relax.
  5. Repeat this several times.

When to see a doctor of PT

Upper back pain often gets better on its own, particularly with rest and gentle stretching.

However, see a doctor if the pain is severe or does not go away. The PT can help determine whether there is a more serious cause for the pain and can recommend treatment options.

Summary

Upper back pain is common and usually not a cause for concern. Rest, over-the-counter medications, and gentle stretches and exercises can often help relieve the pain.

See a doctor of PT for an evaluation if the pain is severe, if it does not get better, or if there are any other symptoms or concerns.


3 Ways a Physical Therapist Can Help Manage Headaches

Headaches affect 47% of the global population and are described by the type and location of pain in the head. Many headaches are harmless and resolve gradually. However, more frequent moderate to severe headaches can impact your ability to do daily activities and quality of life.

Different types of headaches include:

  • Tension
  • Cervicogenic or neck muscle-related
  • Migraine
  • Secondary headaches from an underlying condition, such as fever, infectious disease, sinus disorder, or in rare cases, a tumor or more serious illness
  • Unspecified headaches

A physical therapist will perform a clinical examination to diagnose the type of headache and develop an effective treatment plan. Physical therapy has been proven to:

  • Decrease or resolve the intensity, frequency, and duration of headache
  • Decrease medication use
  • Improve function and mobility
  • Improve ease of motion in neck
  • Improve quality of life

A physical therapist treatment plan may include:

  1. Manual therapy: Proven hands-on techniques are designed to alleviate joint and muscle stiffness, increase the mobility of the head and neck, decrease muscle tension and spasms, and improve muscle performance.
  1. Exercise: Research has shown that various types of specific exercises will decrease pain, improve endurance, decrease inflammation, and promote overall healing. In addition to individualized prescribed exercises, customized home-exercise programs are an essential part of the treatment plan.
  1. Education: Educational strategies have been found helpful at lessening the severity and/or frequency of headaches. These strategies include identifying highly individualized triggers (ie, dietary, sleep, movement/postural habits, stressors, hydration). Effective strategies to alleviate symptoms also include a wide variety of relaxation techniques.

Why suffer if there’s a possibility you can have relief? And we CAN help!

Let’s talk! Give us a call for a complimentary assessment. We will help you live pain-free.

Did you know there’s no prescription needed from a doctor to see us?

(949) 443-0713

logo-top

Should I Ice or Heat My Injury?

As a licensed physical therapist, I have been asked about ice versus heat many times. “When should I use ice?” “When should I use heat?” “What about IcyHot?” Then, there are the patients with pulled muscles who ask me, “Should I try to stretch it?” So, ice versus heat: which should you be doing? Well, it depends.

When to Use Ice

As a general rule, I advise using ice for any acute injury (injury occurring within the last 48-72 hours.) Ice will control the inflammation and prevent a muscle or joint from becoming so puffy and stiff that it cannot heal properly. Now, there are some people in the world of sports medicine who will argue against the use of ice because they believe inflammation is part of the natural healing response. This is absolutely true, however,the inflammatory process occurs immediately; so even the fastest application of an ice pack will not beat this natural inflammation.

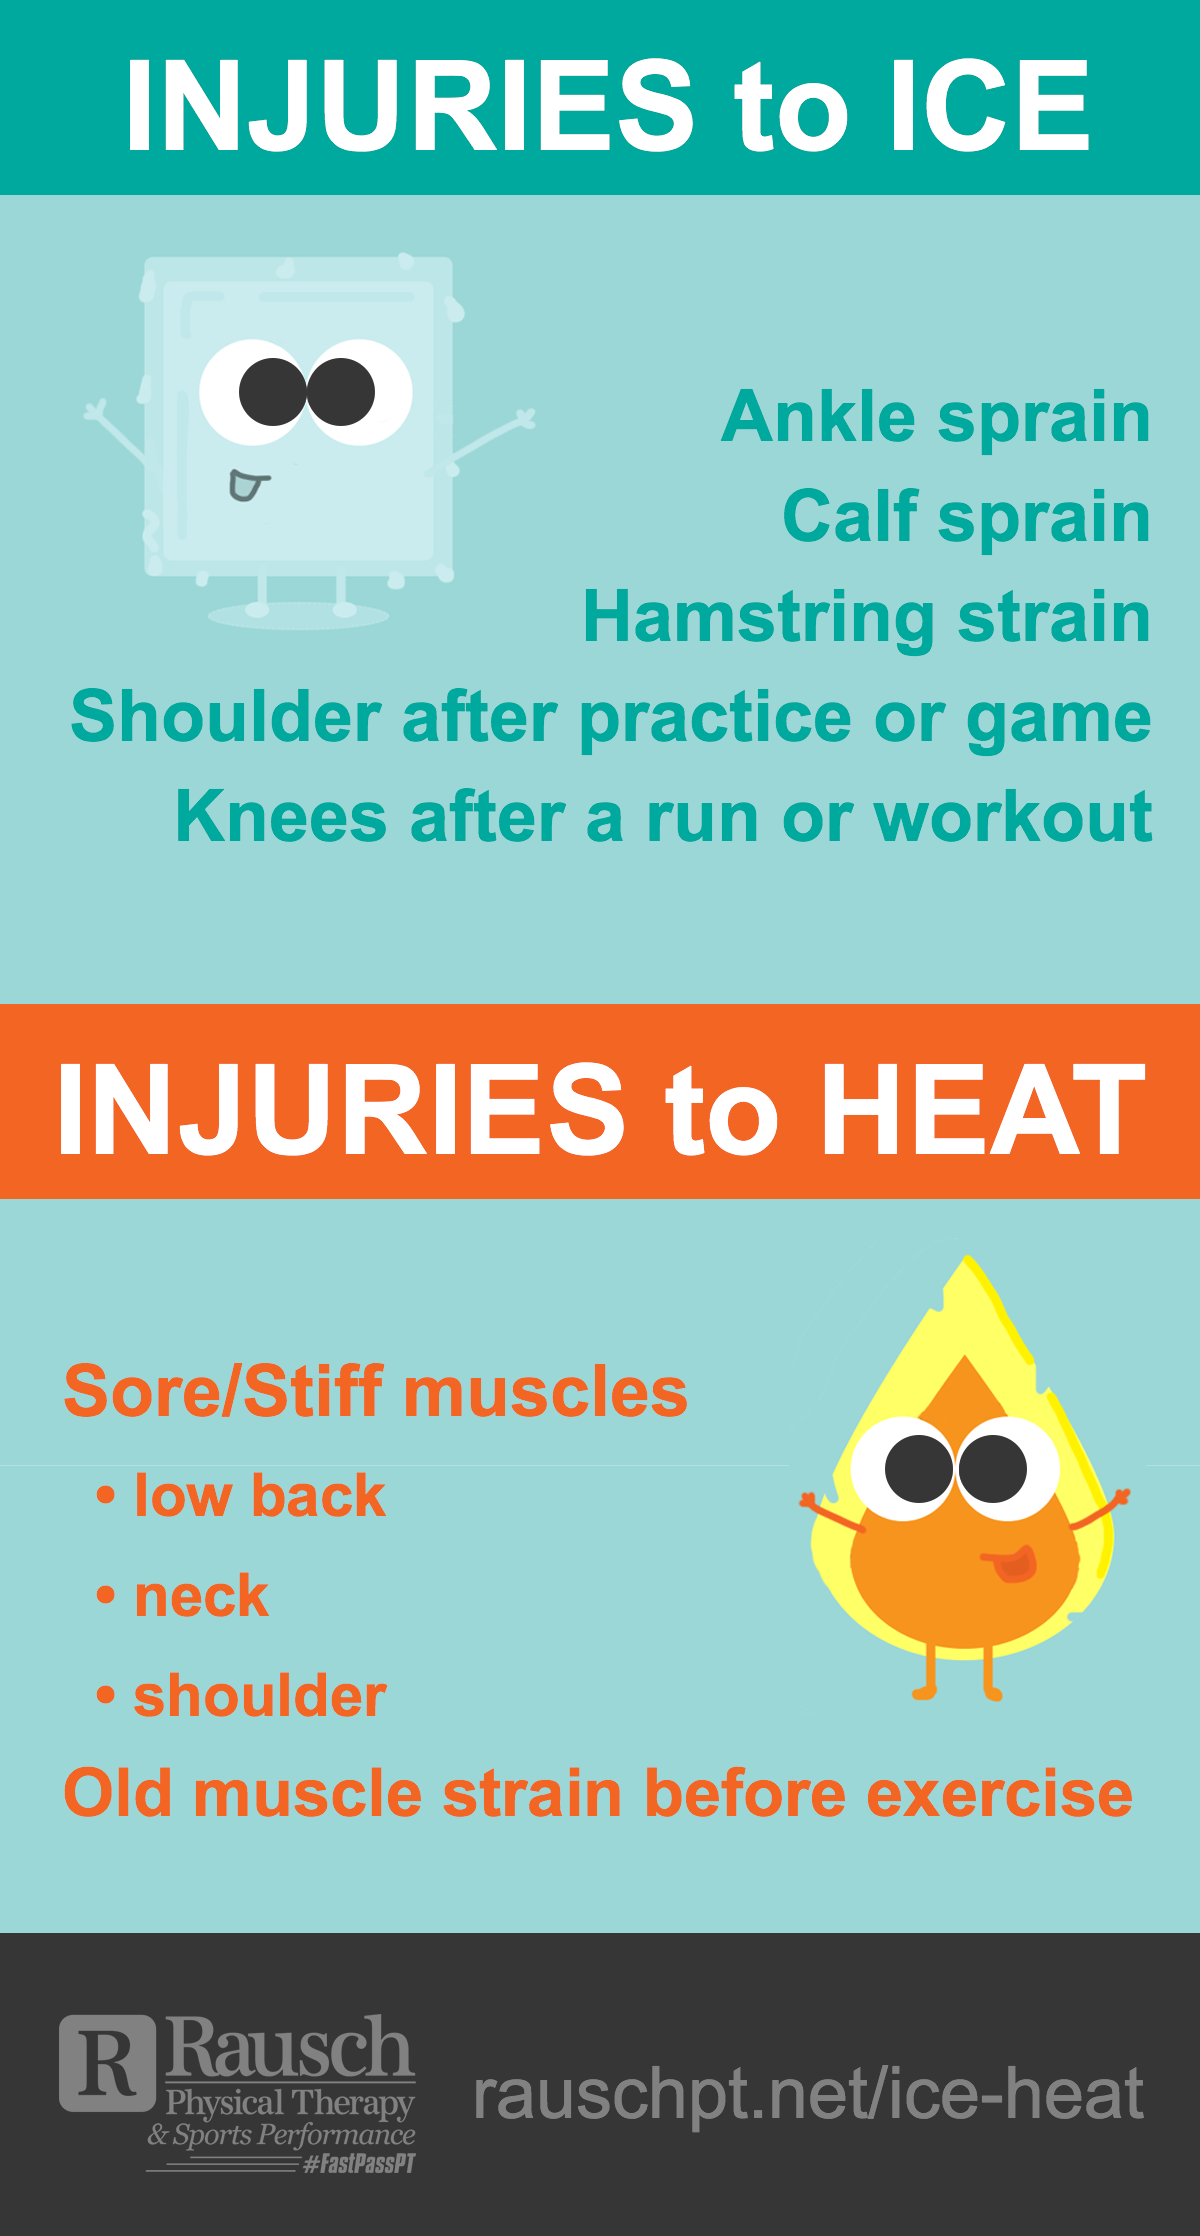
Rausch PT Ice-Heat-InfographicApplying ice simply prevents the natural inflammation and swelling from becoming excessive and potentially causing secondary tissue death, which happens when there’s so much swelling that blood flow is completely blocked and healthy tissue becomes hypoxic. In clinical practice, uncontrolled swelling turns into pitting edema (a thick, putty-like substance that leaves an indentation when you press on the tissue.) This in turn leads to a stiff and—what I describe as,—“sticky” muscle or joint.

If your injured area is s hot, swollen or painful, ICE IT. Crushed ice is the best at reducing tissue temperature since it undergoes an actual physical change (from a solid to liquid.) But be warned:ice burn is a real thing, and I usually see this with the use of gel packs. To avoid ice burn, use a pillowcase as a barrier between the skin and gel pack. Ice for 10 to 15 minutes at a time. For a brand new injury, ice can be applied hourly.

When to Use Heat

For anything that is stiff, tight or sore, I typically recommend heat. This usually applies to chronic and ongoing injuries – the neck or low back pain after a long day of sitting, or shoulder pain after working on the computer. Heat increases blood flow, relaxes muscle and makes the other fascial tissues more pliable (i.e. the joint capsule.) Physical movement or exercise is actually the best way to increase tissue temperature because your body is warming from the inside. Yes, believe it or not, gentle exercise (walking, stationary cycling, etc.) will actually do more for you than a heat pack.

IcyHot and other topical heat rubs targets the superficial sensory nerve fibers to create the sensation of cold or heat, which can reflexively cause muscle relaxation by inhibiting pain. Does it help with healing? No, but it doesn’t hurt either. Know that there is no magic solution.

Whether you are using ice or heat, , ice and heat application should be part of an all-encompassing rehabilitation program – including soft tissue mobilization, strengthening and re-training of motor control and movement patterns.

Pulled Muscles: Stretch or Don’t Stretch?

First off, you should always do a proper warm-up and cool-down to help prevent pulling a muscle in the first place. However, if you have a pulled hamstring or strained calf, DO NOT stretch it. You should never try and stretch an already over-stretched muscle.. A muscle strain occurs when the muscle fibers are pulled beyond their ability to recoil properly, so they snap back. Yes, I know it’s tight, but if you pull on (stretch) it,  the muscle will only continue to tighten and add to the current strain.

Instead of stretching it, now would be an appropriate time for ice, and in a couple of days you can start heating, foam rolling and stretching. If you have any doubt, you can schedule an evaluation with your Rausch physical therapist who will  assess the severity of your injury and let you know  when you can start stretching it, as well as help you to strengthen the area to prevent straining the muscle a second time.


Jess-web

Jessica Snyder (PT, DPT, ATC, CSCS) received her Doctor of Physical Therapy degree at the University of St Augustine for Health Sciences – with an emphasis on orthopedics, movement science, and manual therapy. Jessica started her career as a Certified Athletic Trainer working with high school, college and professional athletes. She is also a Certified Strength and Conditioning Specialist (enhancing her ability to build custom strength, stability and performance-centered rehabilitation and return-to-sport programs) and Certified Natural Running Coach. Being a runner herself, Jessica specializes in running-related injuries, including the entire lower extremity. She is also passionate about treating headaches and neck/shoulder pain.