
Neck and Shoulder Archives - Page 2 of 2 - Rausch Physical Therapy & Wellness

Blog

How to Activate Your Scapular Muscles to Alleviate Pain

Sean Swopes, PT, DPT, CSCS
BY SEAN SWOPES, PT, DPT, CSCS, RAUSCH PHYSICAL THERAPY
As a physical therapist, I find that pain in the shoulder/neck area is one of the more common reasons why patients will come to me for help. While many people will write it off to injury, stress or just part of getting older, I know that often the real culprit behind their painful symptoms is the scapula, or the “shoulder blade.” More importantly, I know that pain relief is as easy as consciously changing how your body moves.

What is My Scapula?

The position of your scapula plays a vital role in how the muscles of our neck and shoulder function, as well as how well they function depending on how it moves with motion and while sitting in resting position. Abnormalities in your “resting position” (a.k.a posture) can cause pesky pain in your shoulders and neck.

While your entire shoulder girdle (comprised of the scapula, humerus, and clavicle) connects your arm to the rest of your body, I like to think of the scapula as the hub for the shoulder and neck. The scapula can move in a variety of motions—up and down, in or out, it can even rotate and tilt—but it’s your posture that dictates how it moves. So if you have bad posture, you’re going to have more pain as your scapula moves.

Activating Your Scapular Muscles to Alleviate Pain

The two most significant posture abnormalities that affect the scapula are downward rotation (caused by overactive rhomboids and levator scapulae) and anterior tilting (caused by the pectoralis minor.) In fact, a 2014 article by the Journal of Orthopaedic & Sports Physical Therapy found that a person who has anterior tilting and decreased upward scapular rotation is predisposed for shoulder and neck pain.

So we all know that poor posture is bad and causes pain, but how can we fix it? Well, I’ve found that the most difficult part about correcting postural changes in the scapular muscles is learning how to properly recruit the muscles of the scapula, often referred to as “stabilizing the scapula.”

[one_half]

INCORRECT SCAPULAR STABILIZATION

[vsw id=”NzzyXUg3zzs” source=”youtube” width=”425″ height=”344″ autoplay=”yes”]

[/one_half]
[one_half_last]

CORRECT SCAPULAR STABILIZATION

[vsw id=”CpvLR6WfvXE” source=”youtube” width=”425″ height=”344″ autoplay=”yes”]

[/one_half_last]

Throughout your body, the more dominant muscles groups have the tendency to “turn on” first and predetermine the movement pattern. In the scapular region, the rhomboids tend to be the strongest muscles, and people will often over-recruit from them, which causes downward (counterclockwise) rotation. This completely abducts the scapula together, which in turn predisposes certain “big” muscles in the neck to be turned on all day.

The job of your big neck muscles is to produce movement, not stabilize your neck or shoulder, so you will often notice the overuse of these muscles by the formation of trigger points or “knots” in the shoulder girdle.

The correct form involves small movements, which allows the scapula to lay flush with the thorax and creates a small amount of posterior (backward) tilting in the scapula.

Three Ways to Correct the Way Your Scapula Moves

Physical therapy is not only about post-surgery rehab or strengthening muscles, it’s also about creating different movement patterns so you can correct dysfunction in the body. The difference between exercise and therapeutic exercise is the intent behind the movement; we need to have conscious control of our body and determine how it moves, as opposed to allowing our body’s muscular restrictions to determine how we move.

Here are three ways you can add intent to your movements throughout your day to change the way your scapula muscles moves and to alleviate discomfort in your shoulders and neck.

1. Practice scapular recruitment. Before you can strengthen the muscles surrounding your scapula, you first have to establish the correct way to position your shoulder girdle. Practice scapular recruitment by gradually pulling your shoulder blade back and down (the downward recruitment should cause a small amount of tilting in a posterior direction.) Once you have the basics down, you can start adding in strengthening exercises, such as rotator cuff strengthening (with a stabilized shoulder blade), 90/90 walkouts, swimmers, etc.

2. EXERCISE 1: Middle and Lower Trapezius Strengthening in an Overhead Position (Without Arm Movement). One of the most common shoulder issues is shoulder impingement, which can be affected by scapular posture. The downward (counterclockwise) rotation of the scapular decreases the subacromial space which increases the chances of impingement.

[vsw id=”4AM2S_E15ac” source=”youtube” width=”425″ height=”344″ autoplay=”yes”]

To perform the exercise, lay on your stomach and recruit the middle and lower trapezius muscles without allowing the deltoids and the rhomboids to over-dominate the movement.

3. EXERCISE 2: Middle and Lower Trapezius Strengthening in an Overhead Position (With Arm Movement). Ready for a challenge? Adding the arm movement makes this exercise a little harder and will help you strengthen those scapular muscles. Just make sure you do this correctly by initiating the movement from the scapula and not overusing your deltoids nor over-activating the upper trapezius muscle. Once you have the movement coordination established, perform the exercise on a stability ball for an added challenge.

[vsw id=”qcloPXdRoXU” source=”youtube” width=”425″ height=”344″ autoplay=”yes”]


StaffHeadshot-Sean2Sean Swopes, PT, DPT, CSCS graduated from CSU Fullerton with a bachelor of science in kinesiology. He went on to receive his doctorate in physical therapy in 2015 from University of St. Augustine, and began his career here at Rausch Physical Therapy and Sports Performance. Sean is also a certified Strength and Conditioning Specialist. As a physical therapist, Sean’s goal is to help his patients understand their musculoskeletal impairments and work together to improve them.

Click to learn more about Sean and our other physical therapists »


Let’s talk! We are here to help. Give us a call for an initial evaluation and assessment. We would love to meet you.

Did you know there’s no prescription needed from a doctor to see us – but we will communicate your progress and treatment to your doctor if you’d like us too!

(949) 276-5401

RauschPT

Disclaimer — All the information that you find on our blogs and social media pages are for informational purposes only and are not intended to be used as your personal professional diagnosis, or treatment. Come and see us for your excellent, personalized care! https://rauschpt.net/

3 Ways a Physical Therapist Can Help Manage Headaches

Headaches affect 47% of the global population and are described by the type and location of pain in the head. Many headaches are harmless and resolve gradually. However, more frequent moderate to severe headaches can impact your ability to do daily activities and quality of life.

Different types of headaches include:

  • Tension
  • Cervicogenic or neck muscle-related
  • Migraine
  • Secondary headaches from an underlying condition, such as fever, infectious disease, sinus disorder, or in rare cases, a tumor or more serious illness
  • Unspecified headaches

A physical therapist will perform a clinical examination to diagnose the type of headache and develop an effective treatment plan. Physical therapy has been proven to:

  • Decrease or resolve the intensity, frequency, and duration of headache
  • Decrease medication use
  • Improve function and mobility
  • Improve ease of motion in neck
  • Improve quality of life

A physical therapist treatment plan may include:

  1. Manual therapy: Proven hands-on techniques are designed to alleviate joint and muscle stiffness, increase the mobility of the head and neck, decrease muscle tension and spasms, and improve muscle performance.
  1. Exercise: Research has shown that various types of specific exercises will decrease pain, improve endurance, decrease inflammation, and promote overall healing. In addition to individualized prescribed exercises, customized home-exercise programs are an essential part of the treatment plan.
  1. Education: Educational strategies have been found helpful at lessening the severity and/or frequency of headaches. These strategies include identifying highly individualized triggers (ie, dietary, sleep, movement/postural habits, stressors, hydration). Effective strategies to alleviate symptoms also include a wide variety of relaxation techniques.

Why suffer if there’s a possibility you can have relief? And we CAN help!

Let’s talk! Give us a call for a complimentary assessment. We will help you live pain-free.

Did you know there’s no prescription needed from a doctor to see us?

(949) 443-0713

logo-top

The Best Pillow Position for Avoiding Morning Neck Pain


Do you wake up with a stiff or aching neck every morning? Your pillow could be the culprit! PT Amanda Hurst breaks down pillow position 101 and shares her fluffy recommendations so you can get your best sleep and better morning.

Amanda-Blog
BY AMANDA HURST, PT, DPT, ATC, RAUSCH PHYSICAL THERAPY

Do you wake up with a stiffness, pain or discomfort in your neck? It could be due to the position of your pillow. That’s right, your pillow is your friend and deserves to be used correctly! The purpose of a pillow is to support the weight of your head, which on average weighs about 11 lbs.

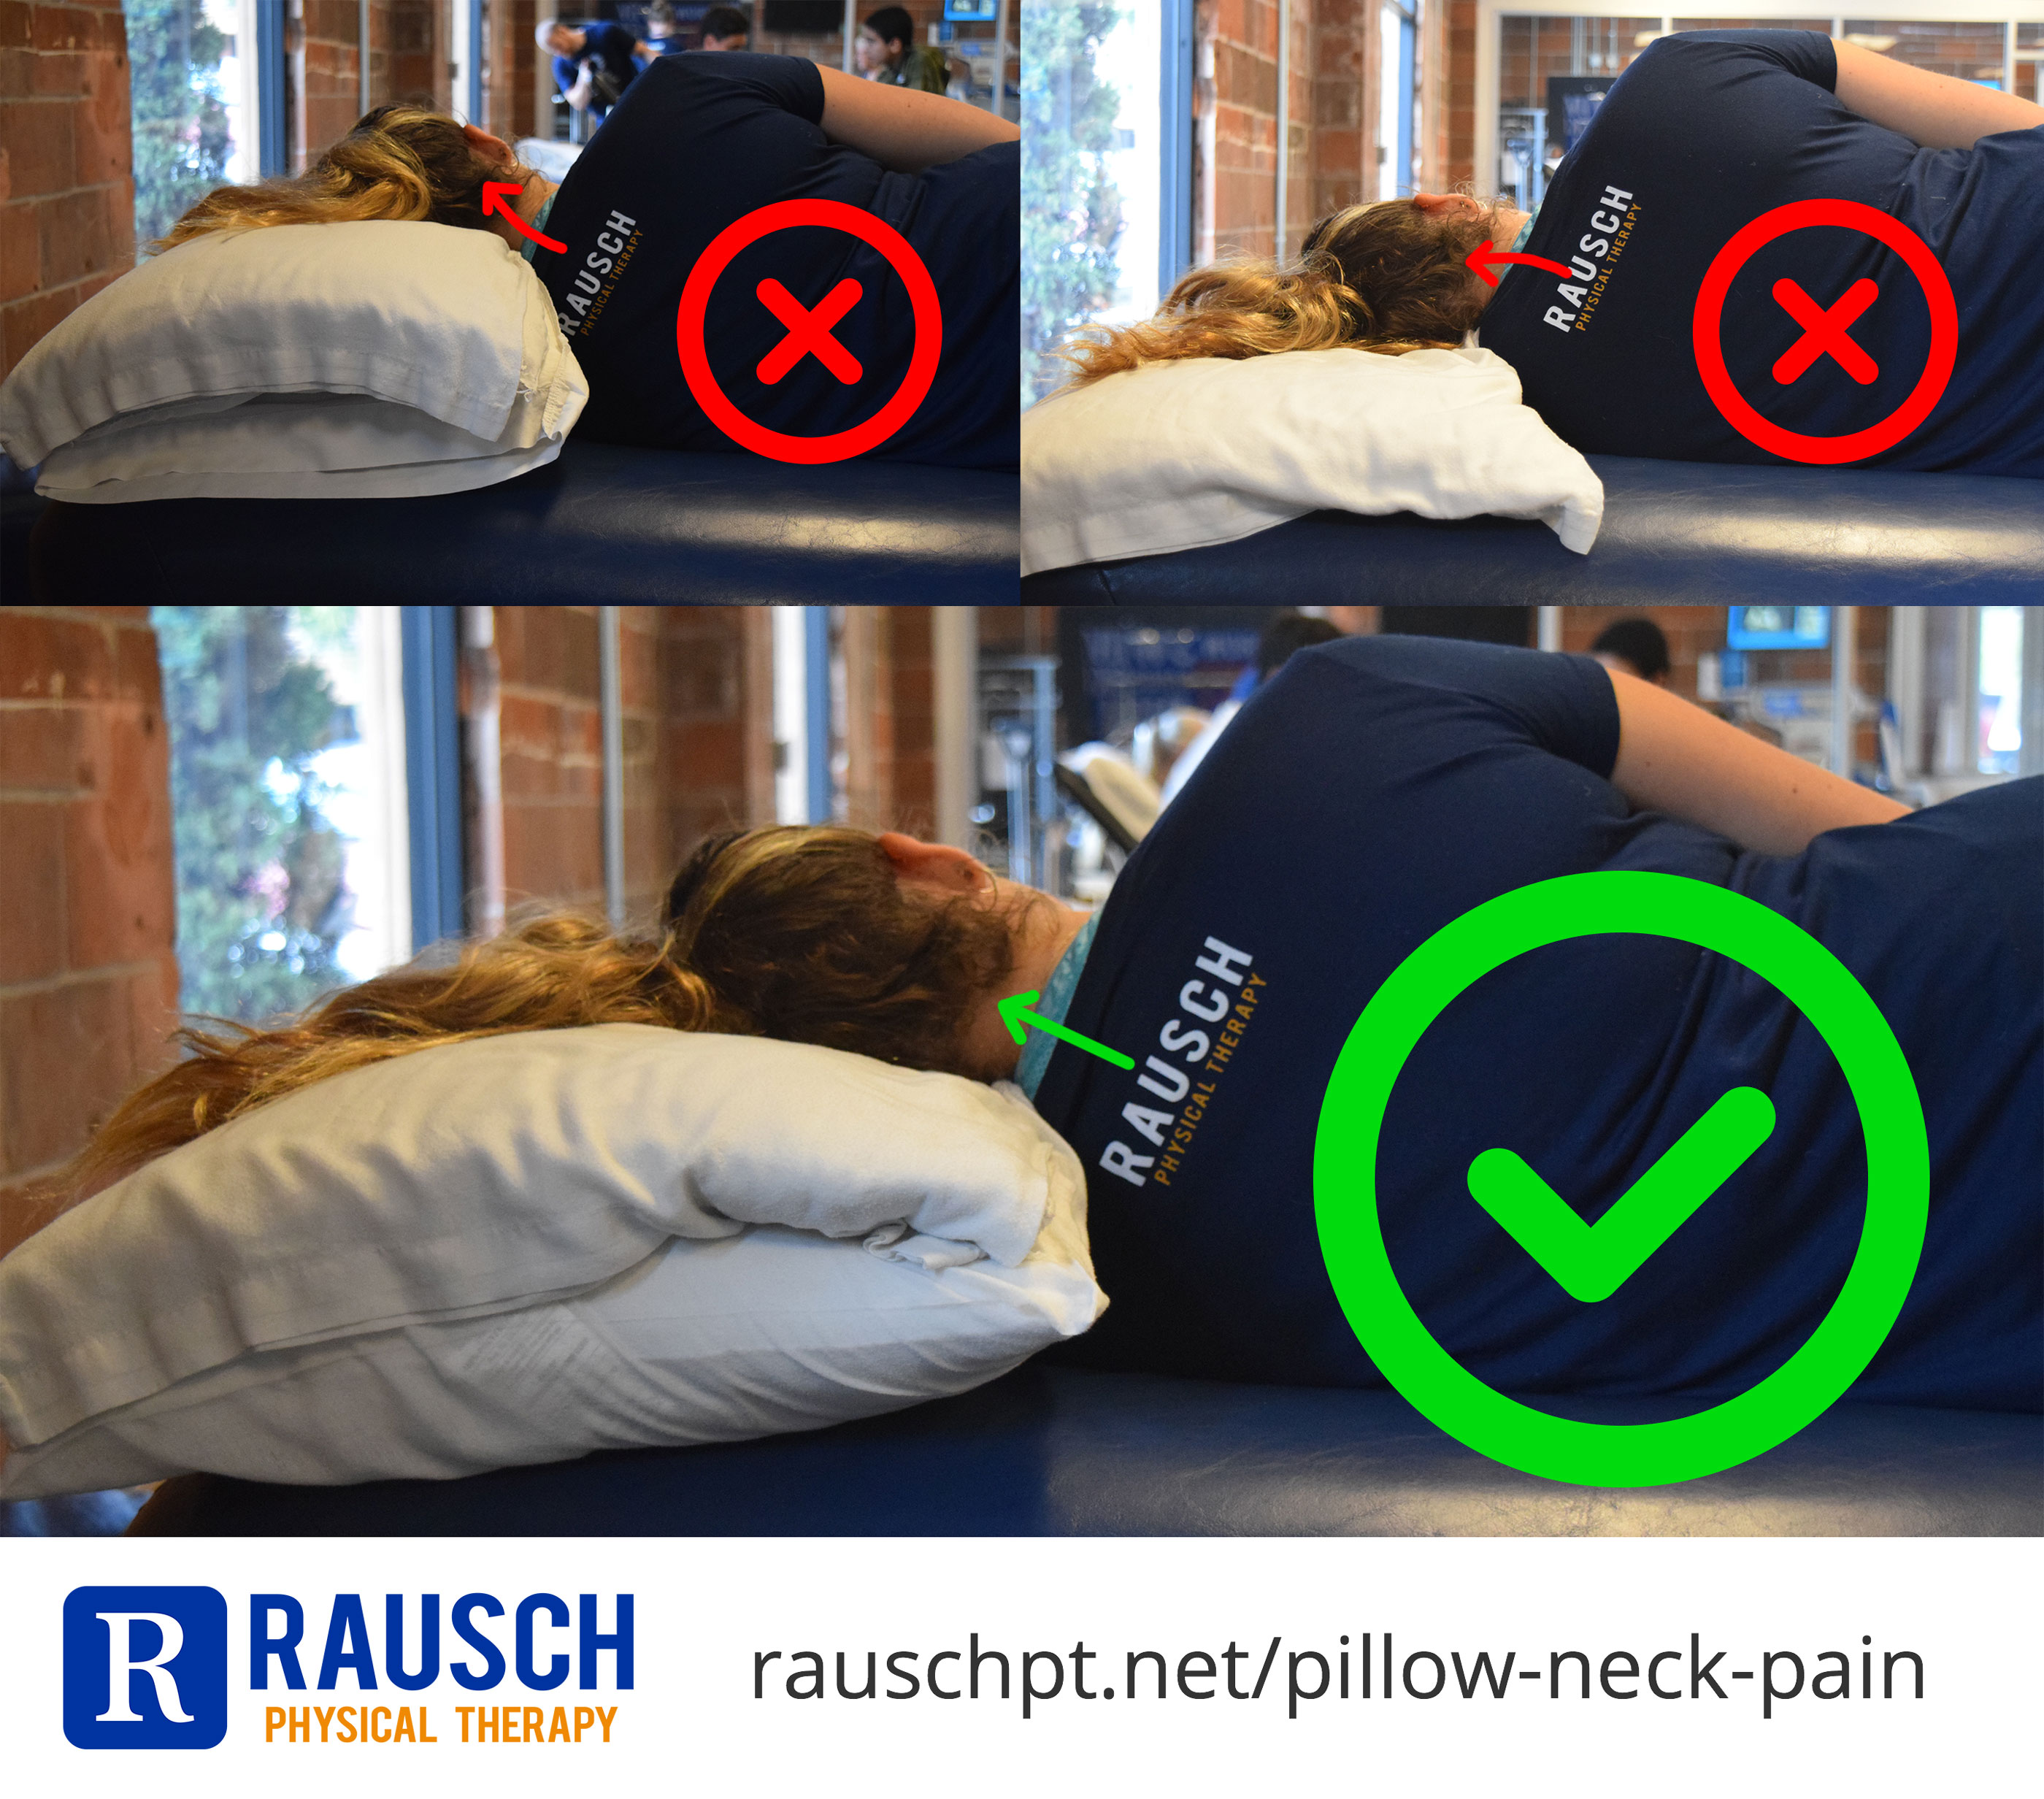
When your head is properly supported by your pillow, your neck muscles are allowed to relax or turn off, which means no muscle tension or pain in the morning. Here’s a simple four-step pillow check to help you rest easy:

  1. If your shoulders are ON the pillow, your head will be NOT be supported! This creates increased neck extension shortening or tightening of the neck muscles, nerve impingement, and stiffness in the vertebral joints.
  2. Tuck your pillow into the crevice of your neck and fully relax into it.
  3. Your head should be in a neutral position, not too extended or too flexed forward (have someone check or take a picture for you.)
  4. If your pillow does not allow your head to be in neutral, either go buy a new one or fluff that sucker up!


Click to enlarge

What is the best pillow?

If you like your pillow and it doesn’t cause pain once you make sure you’re using it correctly, then keep it! If you make the adjustments above and you’re still waking up with stiffness, nerve symptoms or pain, it’s time to try a new pillow.

  • Down or alternative-down is recommended
  • Avoid foam pillows; they have a natural resistance that can cause your neck muscles to activate to combat that resistance while you’re sleeping
  • No, you do not need to spend your life savings on the newest, fanciest pillow. There are some great, affordable options that won’t break the bank and will still help you achieve that neutral position you need for a great night’s sleep and pain-free morning.

Here are some of my personal favorites:


The Best Pillow Position for Avoiding Morning Neck Pain 1Amanda Hurst, PT, DPT, ATC graduated from Concordia with her degree in Exercise and Sports Science and became a certified athletic trainer in 2010. She went on to receive her doctorate in physical therapy in 2013 from Chapman University and has been practicing as a licensed physical therapist for the past five years in a variety of physical therapy settings, including hospital and private practice outpatient, acute care, and lab assisting. Her love of sports led her to Rausch Physical Therapy & Sports Performance, where her goal is to return all her patients back to their sport, recreational activity or hobby, and to keep our community active, healthy and happy.

Learn more about Amanda and our other physical therapists »

Three Easy Ways to Avoid Neck Pain While Cycling


Don’t let cycling be a pain in the neck. DPT Max Biessmann shares his three quick fixes for helping alleviate and prevent pain, aches and soreness in the upper back and neck while on your bike.

Three Easy Ways to Avoid Neck Pain While Cycling 2BY MAX BIESSMANN, DPT, RAUSCH PHYSICAL THERAPY
USAT LEVEL I COACH, ASCA LEVEL I COACH, USA SWIMMING COACH


Approximately 66 million Americans enjoy cycling for sport, and why wouldn’t they! It’s a great workout, social, and is perfect for cross training or for people with chronic injuries because of the reduced impact cycling has on the body. Unfortunately, many cyclists find themselves struggling with pain or discomfort, whether it’s the inability to get comfortable on the saddle or one of the most common complaints: neck/upper back pain and discomfort. Many people complain of pain ranging from soreness and aching, to numbness or tingling in their arms and hands, to sharp shooting pains in the neck and arms.

What Causes Neck Pain While Cycling

While cycling, your neck is in an extended position, doing its best to hold up your rather heavy head (the average head is 10 to 11 lbs.) Not only must your muscles do all the heavy lifting since the spine is unable to support the weight directly, but this also causes a closing down of the facet joints in your vertebrae. This constant closing can cause nerve irritation and excessive wear and tear on the joints.

As with anything you do, the longer you spend in a specific position, the more your body adapts to maintain that position. So, when you’re spending hours and hours per day hunched forward at your desk, in front of a laptop, looking at your phone, and on your bike, the more your body adapts to this position. This can cause the common posture dysfunction upper crossed syndrome, which is when your neck extenders (the muscles you use to look up) get short and tight, while the deep neck flexors (the muscles that tuck your chin down) get stretched out and relatively weakened.

Three Easy Ways to Avoid Neck Pain While Cycling

This combination of muscular imbalances and decreased nerve root space can lead to any combination of symptoms from chronic aching to shooting pains. Luckily, there are several very simple things you can do to decrease these symptoms if you already have them or prevent them from starting in the first place.

#1: Check how you’re riding your bike
Lawrence performing a Bike Right session at Rausch PT.The first thing to consider is how you’re riding your bike; a very small change here can have a big positive change. Are your arms always locked out at the elbows? Do you have a death grip on the bars? Are your shoulders hunched up and stuck in your ears? All of these can lead to cycling pain. Here are some quick fixes to make sure you’re riding your bike right:

  • Make sure your elbows are slightly bent in order to allow your arms to absorb vibrations and impacts from the road or trail.
  • Your hands should be snugly gripping the bars or hoods, but still staying relaxed in order to allow proper blood flow.
  • Shoulders should be relaxed and loose to help absorb shocks your elbows can’t absorb alone.
  • Make sure to look forward with your eyes as well as your neck in order to try and reduce some of the extension in your neck.
  • Check your helmet; it may be sitting too low on your forehead and obstructing your view causing you to look up more.

Remember, while cycling the only part of your body that should be working really hard is your legs; make sure you’re keeping your neck, shoulders and arms in a relaxed ready to go state. If you don’t feel you’re moving correctly on the bike, schedule a Bike Right session and have a physical therapist assess how you’re moving on your bike; having someone else watch you ride can help isolate the specific movement deviations and bad habits you may have developed over time.

#2: Work your body

To help prevent some of the adaptive muscle shortening and nerve compression from cycling, try these 10 simple exercises and stretches. These are also great exercises to do if you work at a desk a lot!

Stretches/Mobility:
  1. Pec Stretch: Stand in a doorway and put your arms out to either side and slowly lean forward until you feel a stretch through the front of your chest into your armpit. Play with the height of your arms above, at or below your shoulders to get the various fibers of the muscle. Do 2-3x for about 30 sec each.
  2. Upper Trap/Scalene: Sitting in a chair, grab the bottom of the chair and side-bend away from that side. Look up for a scalene stretch and look down for a upper trap stretch. Do 2-3x for about 30 sec each side.
  3. Neck Extensors: While sitting, gently pull the back of your head forward while gently pushing in on your chin till you feel a stretch just at the base of your skull. Don’t crank on this one, take it easy on your jaw, it should be a fairly gentle stretch. Do 2-3x for about 30 sec.
  4. Pec Release: Take a tennis or lacrosse ball and place it between your chest, near the front of your armpit, and the wall. Roll the ball around until you find any tender spots and spend about 10-20 sec massaging that area. Spend about 1 min on each side
  5. Upper Trap Release: Place a tennis or lacrosse ball in pillow case and lean against the ball and a wall anywhere between your shoulder blade and spine up through the base of your neck. Massage out any tender or sore spots for about 10-20 sec per area; spend approximately 1 min on each side
  6. Foam Roll Extensions: In order to take strain off of the joints of your neck make sure your upper back can move well. Lie across a foam roller on your back with your arms supporting your head and your hips on the ground and lean back to extend your upper back. Start about halfway up your back and continue up until just short of your neck. Do about 5 extensions at each spot moving the foam roller up about an inch each time.
  7. Towel Rotations: Wrap a small hand towel or pillowcase around the back of your neck, grab the ends with the opposite hands. Pull down to anchor the towel with one hand and pull the towel across your chin as you rotate your head, when you get to the end of your range add a little bit of overpressure from the towel to help stretch into the movement.
  8. Thread the needle: Begin in quadruped position (on hands and knees), place foam roll on the outside of one arm. Once there, reach with the arm furthest away from foam roll under the body to make contact on top of foam roll and roll through, rotating upper spine.


Strengthening:
  1. Chin Tucks: Begin by lying flat on your back with a soft pillow under your head. First gently press the back of your head into the pillow as you tuck your chin in, as if you’re making a double chin, hold for 10 seconds then relax, repeat 10-20 times. If this is easy practice against a wall while doing a wall sit.
  2. I’s, T’s and Y’s: Lying flat on your stomach, across a swiss ball or end of bed or couch, place your hands at your side (I) out to the side at shoulder height with thumbs up (T’s) or above your head and out to the side (Y’s). The focus of the movement is to move your shoulder blades not so much your arms, squeeze your shoulder blades together and squeeze for 10-15 seconds and relax, repeat 10-20x in each position. The Y’s will be the hardest so start with less reps here and advance as it becomes easier. While lying on your stomach focus on good posture through your entire spine all the way to the top of your head.


#3: Get a Bike Fit

If none of these “quick fixes” seem to help, it may be time to reassess your bike fit. First off, were you ever fit? If so, how long ago? Your body changes, so you should really get a bike fit every year or so.

There are many aspects of the bike fit that can affect how much strain and what kind of strain is being placed on your neck and upper back:

  • The most obvious is your handlebar height; the lower they are the more you have to look forward to see (looking at you, triathletes!)
  • The length of your bike, the distance between saddle to handlebar, can also affect how much you have to reach and how you carry your weight through your arms.
  • The width of your handlebars may be too wide or to narrow, which can make it difficult for your arms to rest or settle in a comfortable position.
  • Triathletes, look at both bullhorn and aerobar pad positions.
  • The angle of your hoods on a road bike might pitch the angle of your wrists and affect how you carry your weight through your arms.
  • The tilt of your saddle can cause you to be unbalanced between handlebars and saddle.


Nikki performing a Bike Fit at Rock N’ Road Cyclery Laguna NiguelBike fitting should be left to a professional fitter, as small changes in one area of the bike can have a huge effect on other parts of your body. A proper bike fit is a valuable service; these pros can make the necessary adjustments to your machine that will help with comfort, injuries and power output. You can google around for local bike shop that does Bike Fits, or if you’re in South Orange County check out Rausch PT’s tried and true favorites:


Conclusion

Don’t let neck pain stop you from enjoying the sport you love. By making a few quick adjustments and getting a professional bike fit, you can continue to ride hard and ride long for many years to come.


StaffHeadshot-MaxMax Biessmann, DPT is a licensed physical therapist at Rausch Physical Therapy & Sports Performance. He received his Doctorate of Physical Therapy degree at the University of St. Augustine, San Marcos in 2016 and started his career at Rausch PT. Max is passionate about helping people achieve their goals through physical therapy and innovative rehab technologies. As the Endurance Sports PT, Max says he’s lucky to be able to combine his professional coaching experience and PT knowledge to help his patients achieve their personal bests in sports and daily life.

Learn more about Max and our other physical therapists »


How to Alleviate Shoulder Pinching

JM-BLOG
BY JONATHAN MELTZER, DPT, RAUSCH PHYSICAL THERAPY

Have you ever felt an annoying or painful pinch in your shoulder when lifting your arm? Shoulder impingement is a common diagnosis that we at Rausch Physical Therapy treat in a surprisingly wide variety of people, from tennis players to swimmers to desk employees. I’ve even treated a businessman who felt a terrible pinch every time he put his luggage in the overhead bins while traveling. Do you present with this painful arch of motion?

What is Shoulder Impingement?

Imagine your shoulder as a ball-and-socket joint, where the ball is the arm and socket is a suction cup within the shoulder. When the arm moves through space, the ball is designed to sit in the suction cup to freely rotate and spin around. Injuries develop and patients will notice a pinch when the ball has migrated too far upward or backward so that it’s now hitting on the shoulder component every time the arm lifts to the 90° range. Once the ball clears the socket, the pain stops because there’s no longer compression at the top of the shoulder, hence the quick “pinch” feeling.

If you take a look at the diagram here, you’ll see:

  1. The rotator cuff muscle
  2. The bursa: a fluid filled cushion sac
  3. The acromion: the top of your shoulder blade


As you can see, these three structures have very little space between them to begin with. The more the ball resides in the superior position, the more these individual structures are going to become damaged. The chronic wear-and-tear on this impingement is similar to rubbing a rope on a rock over and over again; if impingement is left untreated, there could eventually be the development of a rotator cuff strain or even the potential for a full tear.

Who is at Risk for Shoulder Impingement?

For one, if you’re an overhead athlete (baseball, swimming, volleyball, etc.) you are constantly jamming the shoulder joint, which creates further compression of the rotator cuff. Or, if you are like the majority of Americans and sit at a desk for work, your shoulders start to roll forward from sitting in this position five days a week. Without postural correction, over time your body actually changes its alignment to round over, which again decreases the space in your joint and ultimately limits your overhead motion.

Three Stretches to Help Alleviate the Pinch

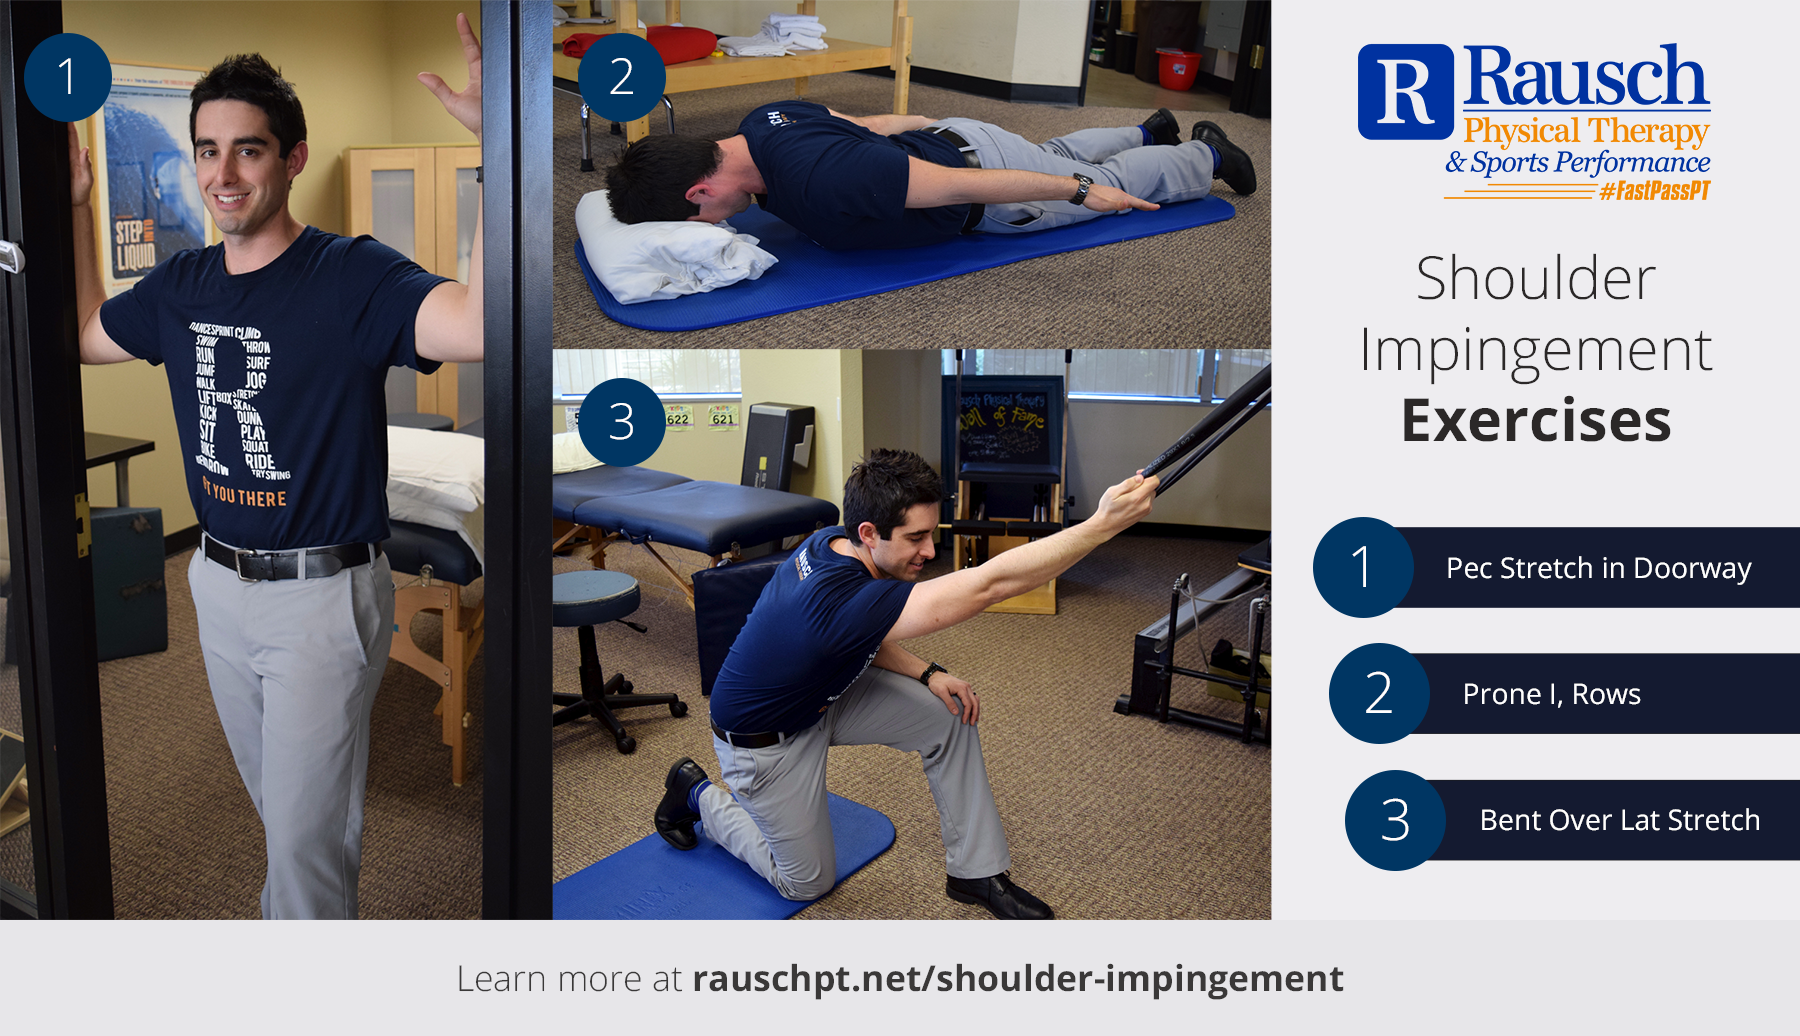
Here are three exercises to help alleviate shoulder impingement and encourage the recruitment of our shoulder blade muscles to improve posture:

2Jon-ShoulderImpingement-ExercisesClick to enlarge image

  1. Pec Stretch in Doorway: Lean forward in a doorway until stretch is felt (30 seconds x 3)
  2. Prone I, Rows: Laying on a flat surface, squeeze your shoulders blades together, then slightly lift your arms (15 reps x 2)
  3. Bent Over Lat Stretch: Grab band, turn palm up, kneel on opposite knee, then carefully lean back to feel stretch (30 seconds x 3)


In addition to these recommended stretches, you should also make modifications to certain activities that aggravate your shoulder, such as limiting overhead lifting and correcting your sitting posture throughout the day. If the painful arch continues, call us to make an appointment (no, you don’t need a doctor’s referral or Rx!) Our licensed physical therapists at Rausch Physical Therapy will quickly evaluate your specific injury and help alleviate pain and recommend additional exercises to help you finally find relief from chronic shoulder pain.


StaffHeadshot-JonJonathan Meltzer graduated from the University of Redlands with a bachelor of arts in biology and a minor in physical education. Following graduation, Jonathan discovered his passion for physical therapy while working as a Physical Therapy Aide. After graduating top of his class from Loma Linda University in 2012 with a Doctorate in Physical Therapy, Jonathan began his career at Rausch Physical Therapy and Sports Performance. Jonathan’s goals are to identify limitations and treat his patients with the most recent and innovative techniques in order to maximize functional independence and obtain his patients’ individual goals.


Understanding Frozen Shoulder and How to Fix It

A question that I commonly hear from patients with shoulder pain (and access to Google) is, “What is frozen shoulder?” The truth is, “frozen shoulder” is a common term that’s thrown around, but few people understand the condition or its causes.

What is “Frozen Shoulder?”

The medical term for frozen shoulder is “Adhesive Capsulitis,” and it effects the joint capsule of the shoulder. Every joint within the body contains a capsule surrounding it to provide structural stability; the shoulder joint is special in that it’s one of the most mobile joints in the body, which consequently requires a great deal of ligamentous (capsule) and muscular support to stabilize it.

Like all tissues within the body, the shoulder capsule will attempt to repair itself if damaged, going through the three phases of tissue regeneration: inflammation (swelling), proliferation (scar-tissue), and remodeling.

However, Adhesive Capsulitis is an abnormal inflammatory response; basically, the shoulder thinks it’s damaged, so it sends an unnecessary amount of new collagen (i.e. scar tissue) to the joint. This transforms the typically-mobile shoulder joint into a thick and adhesive one, which ultimately leads to pain and loss of mobility.

Signs You May Have Frozen Shoulder

While a stiff, painful shoulder could be caused by a number of things, many patients or their doctors will incorrectly diagnose it as frozen shoulder. However, the number one indicator that you truly have a frozen shoulder is if there’s a significant decrease in external rotation, especially compared to your other arm. Some other common symptoms include:

  • Significant decrease in range of motion, especially loss of external rotation (ability to life your arm overhead)
  • Gradual onset of pain lasting at least one month
  • Progressive pain in the shoulder that worsens and is not relieved at rest
  • Pain that interrupts sleep and/or makes it impossible to sleep on affected side

Again, it’s important to note that these symptoms can also be indicative of other shoulder issues, so you should have your physician or physical therapist do an evaluation to find out the true cause to ensure you get the proper treatment.

Causes of Frozen Shoulder

There are currently two categories of Adhesive Capsulitis, Primary Adhesive Capsulitis and Secondary Adhesive Capsulitis. Primary affects between 2% to 5.3% of the general population and has no known cause; it’s only characterized by a subtle and gradual onset that worsen over time and then resolves, usually within one to three years.

Secondary Adhesive Capsulitis is more common, affecting between 4.3% to 38% of the general population. It occurs in people who have incurred trauma or impingement to the shoulder, or who have had to immobilize their shoulder for a long period, such as after surgery or injury. People who have systemic complications, such as Thyroid Disease or Diabetes Mellitus, are also at risk.

While doctors aren’t sure why this happens to some people, it is more common to occur in:

  • People 40 and older, particularly women
  • People who have had a previous episode of Adhesive Capsulitis in the opposite shoulder
  • People who have concurrent systemic complications (i.e. Thyroid Disease, Diabetes Mellitus, Parkinson’s Disease, etc.)


Stages of Frozen Shoulder and Their Symptoms

Due to the naturally-occurring inflammatory condition of Adhesive Capsulitis, it’s important to understand which stage of “Frozen Shoulder” you’re in so you can make sure you get the appropriate treatment.

[one_third]

Stage 1: Freezing

Key indicator is pain with movement and at rest

Usually lasts for three to nine months

Gradual loss of motion in all directions

[/one_third]

[one_third]

Stage 2: Frozen

Characterized by pain with movement

Usually lasts for nine to 15 months

Inflammation of the joint capsule begins to lessen

[/one_third]

[one_third_last]

Stage 3: Thawing

Characterized by resolution of pain with residual stiffness

Usually lasts 15 to 24 months after onset

[/one_third_last]

Top Three Ways to Treat Frozen Shoulder

Depending on which stage you are in, the treatment for Adhesive Capsulitis can vary. Here are three of the most common and effective treatments for regaining a full, pain-free range of motion.

1. Take Anti-Inflammatory Medication

Because of this condition’s correlation with join inflammation, coupled with its gradual progressiveness, inflammatory medication (such as Advil, Motrin IB, etc.) can help relieve pain. For more severe cases, a cortisone injection (a localized injection of an anti-inflammatory medication) is available; consult with your primary care physician or physical therapists about this option.

2. If You’re in Pain: Modify Your Activity

During the painful freezing stage, you should modify the way you move throughout your day to help reduce the amount of irritation and inflammation to the joint. If a certain movement, such as reaching to grab a dish or swinging a tennis racket, causes a significant increase in pain, avoid it.

3. If You’re Just Stiff: Stretch It Out!

Once you’ve progressed into the thawing stage and can lift your arm without pain, then it’s time to start aggressively stretching out that shoulder! Since the shoulder capsule is comprised of dense connective tissue, it requires a prolonged stretch (five to 10 minutes) to create a lasting change in tissue length. As long as you are just feeling tightness/stiffness, NOT pain, then keep stretching. Research has shown that improving external rotation can improve motion in all directions and help get you pain free.

If you’re unsure, come visit us here at Rausch Physical Therapy; we can evaluate your particular and come up with a great home exercise program to get you back to pain-free movement.


StaffHeadshot-Sean2Sean Swopes graduated from CSU Fullerton with a bachelor of science in kinesiology. He went on to receive his doctorate in physical therapy in 2015 from University of St. Augustine, and began his career here at Rausch Physical Therapy and Sports Performance. Sean is also a certified Strength and Conditioning Specialist. As a physical therapist, Sean’s goal is to help his patients understand their musculoskeletal impairments and work together to improve them.

Click to learn more about Sean and our other physical therapists >>