For general muscle soreness or tight muscles, you can use a foam roller. Using it can be uncomfortable so it’s better to be too gentle, rather than too intense when you’re starting out learning how to use a roller. You can adjust your intensity as your body responds. To get started, follow the steps below. Questions? You can always check in with us!
Whenever my muscles ache tightly, like stale-hardened licorice, I dream about this massage magician from Hong Kong. In a one-hour session, she would slowly knead my tight muscles, packing on the pressure until the knots unwound.
On the days she massaged my back, the aftermath was like I’d grown wings. On leg days, I would wobble out of the apartment — not because of pain, but because I felt weightless, every gram of tension released.
She’s a 12-hour flight away now, but I recently discovered a second-best option to her healing witchcraft.
Foam rolling
Benefits of foam rolling:
- alleviates soreness
- reduces inflammation that occurs during the muscle repair process
- aids in muscle repair recovery
- helps injury prevention by maintaining muscle length and remedying tension and tightness
- increases blood flow and elasticity of muscle tissue, joints, and fascia — the body’s connective tissue — which helps with mobility, overall well-being, and a smoother appearance of fat underneath your skin
- promotes relaxation — roll away your worries!
Not just for avid exercisers, foam rolling is a type of self-massage that allows you to alleviate tightness or trigger points — a super focused spot of tight muscle, aka muscle knots — by using a piece of equipment known as a foam roller.
According to Nicole Davis, ACE-certified personal trainer, it’s great for people who sit at a desk all day, have poor posture, joint issues, or bad form while exercising.
Davis has got you covered. She put together eight moves to target common tight areas.
“All you’ll need is a low- to medium-density foam roller and some open floor space. Aim to complete this routine three times per week,” Davis says.
You can really do this anytime, but Davis recommends before workouts as a warmup, or after to prevent soreness. I like to do it while watching The Office, before I go to bed.
1. Quads
If a desk job’s got you sedentary most of the day, roll out your quads to get your blood flowing and keep muscles engaged.
Directions:
- Start in a forearm plank position with the roller under your quads.
- Bracing yourself with your upper body and core, begin to slowly roll down the roller until it reaches just above your knees. Then, roll in the opposite direction until you reach your hip flexors.
- Do this for 30 seconds.
- When you hit a tender spot, hold yourself there for a few breaths.
If you want to give yourself more TLC, you can also focus on one quad first, and then the other.
2. Hip flexors
Sitting for extended periods of time can really mess with your hip flexors.
While stretching them is good, foam rolling them is even better because it works on loosening the muscle tissue plus the connective tissue (fascia) around it.
Directions:
- Start by lying down, facing the floor on the foam roller, once again in a forearm plank position. Make sure the foam roller is underneath your left hip flexor and your right leg is bent comfortably to the side.
- Resting on your forearms, begin to roll slowly up and down and side to side on the foam roller to target the hip flexor, paying close attention to trigger points.
- Do this for 30 seconds.
- Switch and repeat on the right hip flexor.
3. Calves
In addition to calf stretches, try foam rolling these muscles for an extra spring in your step.
Directions:
- Start by sitting on the floor with your legs extended, the foam roller positioned underneath your calves.
- Lift your body up so your weight is resting on the foam roller. Cross your left leg over your right for extra pressure.
- Begin to slowly roll your right calf back and forth on the foam roller, navigating your body forward and back with your arms.
- Complete for 30 seconds.
- Switch legs and focus on your left calf.
4. Hamstrings
Another muscle that’s negatively affected by sitting all day, your hamstrings may be in need of some TLC.
Directions:
- Again, start by sitting on the floor with your legs extended. This time, position the foam roller underneath your hamstrings.
- Lift your body up so your weight is resting on the foam roller and begin to slowly roll up and down between the back of your knees and your glutes.
- Linger on tender spots, and roll for at least 30 seconds overall.
An alternative way to complete this is to again cross your legs and focus on one hamstring at a time.
5. IT band
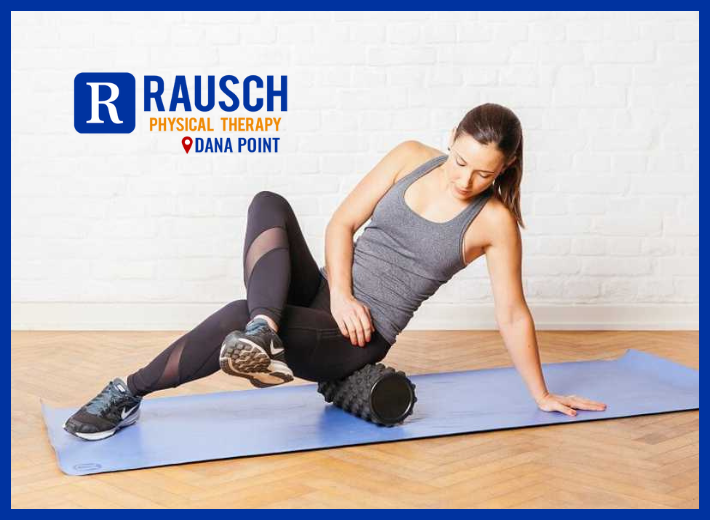
Made of connective tissue, the IT band runs along your outer thigh from the hip to the knee.
Soreness and tightness in this area is common in runners, but anyone can benefit from foam rolling this area.
Directions:
- Begin by lying on your right side with the foam roller positioned underneath your right IT band, or the side of your thigh. Rest your bodyweight on your right forearm. Your right leg should be straight, and your left should be bent at the knee with your foot placed comfortably in front of your right leg.
- Bracing yourself with your upper body and left leg, begin to slowly roll along the foam roller on your right IT band between your knee and glute, stopping at tender spots.
- Repeat for 30 seconds, then switch to roll your left IT band.
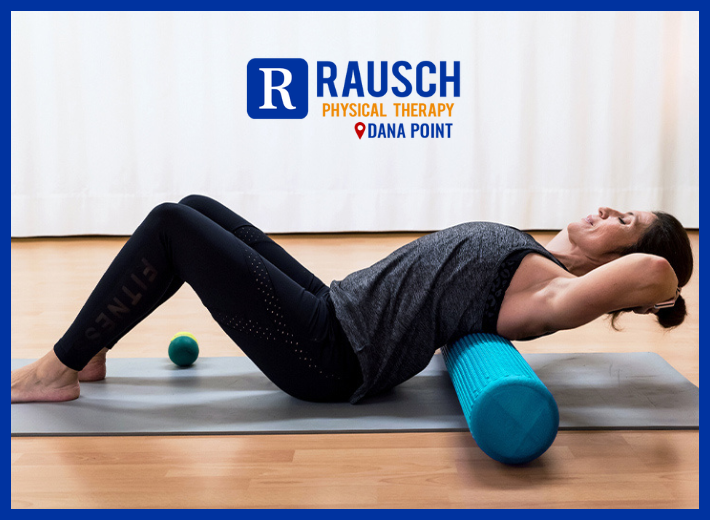
6. Upper back
Poor posture got ya down? If you’re holding tension in your upper back, hop on the foam roller to help loosen things up.
Directions:
- Begin by lying on your back with the foam roller positioned underneath your upper back. Your knees should be bent with your feet flat on the floor and your arms can either be down by your sides or crossed in front of your chest.
- Brace your core and lift yourself up into a shallow bridge position.
- Slowly start to roll up and down between your lower neck and mid-back, stopping at tight areas along the way.
- Repeat for 30 seconds.
7. Lats
Affectionately known as your “wings,” tight lat muscles — located on your back, right below your armpits — can throw your posture out of whack. Make sure they’re nice and loose by hitting them with the foam roller.
Directions:
- Begin by lying on your back at a 45-degree angle with the foam roller positioned underneath your right lat. Keep your right leg straight and bend your left leg into a comfortable position.
- Slowly start to roll from your right armpit down to your mid-back area, focusing on tender areas.
- Repeat for 30 seconds.
- Switch to roll out your left lat.
8. Shoulders
Do your shoulders need some action? Roll out your deltoids to get mobility back.
Directions:
- Lie on your side with the foam roller underneath your right shoulder. Your lower body can be resting on the ground comfortably with your left arm out in front to guide movement.
- Roll slowly up and down over your deltoid muscle. Rotate your trunk slightly so you can hit part of your upper back as well if needed.
- Repeat for 30 seconds.
- Switch sides and repeat on your left shoulder.
When I have intense headaches, especially due to tension in the neck, I like to use my foam roller. This acts like a self-massage that’s stronger than any hand.
Directions:
- Rest your neck on the foam roller, at the top where it connects to your head.
- Slowly turn your head to the right, holding where you feel a tightness.
- Exhale and turn your head to the left.
- Repeat for 30 seconds.
Be careful on the first try
A disclaimer from Davis here: “Foam rolling can be painful, especially if you’re new to it. Pain in a specific area while foam rolling is typically a sign that your muscle or tissue is tight and needs some TLC.”
“Ease into painful spots by starting in the areas right around it and sensitivity should decrease fairly quickly,” she adds. “But, if it’s too much to bear, don’t continue.”
Choosing a foam roller
- Start with a basic low- or medium-density model ($7.99-49.95).
- A small ball ($12.99) can also be beneficial to target smaller areas.
- Need some tough love? Try a rumble roller ($44.95) or the Master of Muscle ($17.97) which provides a deep-tissue release.
As a glued-to-the-desk editor, I can testify that foam rolling has been so good for my well-being.
What used to be chronic tension and needling pain in my arm and shoulder is now gone thanks to my once-a-week classes. Yep, I also pay to do it for an hour a week, just to make sure I’m really getting every knot.
The act itself is as fulfilling as pushing out the last bit of toothpaste from the tube. It’s the pimple-popping of muscle tension, an oddly satisfying mix of pain and pleasure — and after an hour of being my own healer, I leave the gym walking a little lighter.
If you’ve been experiencing muscle soreness, PT can help you reach back to your maximum potential. We are movement experts that treat people of all ages and abilities. Contact our team today at 949-276-5401 and join our Facebook community here.
Reference: [https://www.healthline.com/health/fitness-exercise/foam-rolling-how-to]